Chapter 12: Object-Oriented Programming in JavaScript
Object-oriented programming (OOP for short) is a style of programming that involves separating the code into objects that have properties and methods. This approach has the benefit of keeping related pieces of code encapsulated in objects that maintain state throughout the life of the program. The objects can also be reused or easily modified, as required. JavaScript obviously supports objects, as we saw in Chapter 5, so it also supports an object-oriented style of programming. In this chapter, we’ll look at what object-oriented programming is and how to implement it in JavaScript.
In this chapter, we’ll cover the following topics:
- An introduction to OOP
- Constructor functions
- Using classes in JavaScript
- Prototypes
- Public and private methods
- Inheritance
- Creating objects from objects
- Adding methods to built-in objects
- Mixins
- Chaining functions
- This and that
- Borrowing methods from prototypes
- Our project ― create questions in an OOP way
Object-Oriented Programming
Object-oriented programming is often used to model representations of objects in the real world. There are three main concepts in OOP: encapsulation, polymorphism and inheritance. I’m going to use my juicer to illustrate how each of these concepts can be applied in a programming environment, since the juicer can be considered an object. It’s a wonderful machine that makes fresh juice for me every morning. In many ways, my juicer can be thought of as an object, as it has properties such as speed and capacity, and also has methods or actions it can perform, such as juicing, switching on and switching off.
Encapsulation
When I use my juicer, I put the fruit into the machine, press the ‘on’ button and out comes the juice. I haven’t a clue how it does it—only that it makes a very loud noise! This demonstrates the concept of encapsulation: the inner workings are kept hidden inside the object and only the essential functionalities are exposed to the end user, such as the ‘on’ button. In OOP, this involves keeping all the programming logic inside an object and making methods available to implement the functionality, without the outside world needing to knowhowit’s done.
Polymorphism
My juicer isn’t the only appliance I own that has an ‘on’ button, although the way the on button works is slightly different for each appliance. My juicer also uses the same electrical outlet as other appliances in my kitchen. I can also place various types of fruit into it and it still juices them. These examples demonstrate the concept of polymorphism: the same process can be used for different objects. In OOP, this means various objects can share the same method, but also have the ability to override shared methods with a more specific implementation.
Inheritance
I’d really like the next model up from my juicer, as it can deal with more types of fruit and it’s a bit quieter. Even though it has these extra features, I’m sure that inside it uses many of the same parts that my juicer has. This demonstrates the concept of inheritance: taking the features of one object then adding some new features. In OOP, this means we can take an object that already exists and inherit all its properties and methods. We can then improve on its functionality by adding new properties and methods.
Classes
Many object-oriented languages, such as Java and Ruby, are known asclass-basedlanguages. This is because they use a class to define a blueprint for an object. Objects are then created as an instance of that class, and inherit all the properties and methods of the class. In my juicer example, the juicer class would represent the design of the juicer, and each juicer that’s made on the production line would be instances of that class.
JavaScript didn’t have classes before ES6, and used the concept of using actual objects as the blueprint for creating more objects. This is known as aprototype-basedlanguage. In the juicer example, this might involve building an actual prototype juicer then using this prototype as the basis for making all the other juicers. The juicers based on the prototype would be able to do everything the prototype could do, with some being able to do even more. Even though ES6 now supports classes, it still uses this prototypal inheritance model in the background.
Constructor Functions
In the objects chapter earlier in the book, we saw it was possible to create new objects using the object literal notation. At the end of the chapter we created a dice object:
const dice = { sides: 6, roll() { return Math.floor(this.sides * Math.random() + 1) } }An alternative way to create objects is to use aconstructor function.
This is a function that defines the properties and methods of an object. Here is the dice example rewritten as a constructor function:
const Dice = function(sides=6){ this.sides = sides; this.roll = function() { return Math.floor(this.sides * Math.random() + 1) }}The keyword this is used to represent the object that will be returned by the constructor function. In the previous example, we use it to set the sides property to the argument that is provided to the constructor function, or 6, if no argument is provided. It also adds a method called roll() , which returns a random number from 1 up to the number of sides the dice has.
We can now create aninstanceof the dice constructor function using the new operator.
const redDice = new Dice();<< Dice { sides: 6, roll: [Function] }When Parentheses Aren’t Required
The parentheses are not required when instantiating a new object using a constructor function. The following code would also achieve the same result:
const redDice = new Dice;The parentheses are required, however, if any default arguments need to be provided.
For example, if we want to create another Dice object with four sides, we would have to add 4 as an argument, like so:
const whiteDice = new Dice(4);This returns an object that was assigned to the variable redDice , which is said to be an instance of the Dice constructor function. We can confirm this using the instanceof operator:
redDice instanceof Dice<< trueEach new object that’s created using this function will inherit the properties and methods defined in the function. This means that redDice will have a sides property and roll() method:
redDice.sides<< 6redDice.roll()<< 4Built-In Constructor Functions
JavaScript contains a number of built-in constructor functions such as Object , Array , and Function that can be used to create objects, arrays and functions instead of literals.
The easiest way to create a new object is to use the literal syntax:
const literalObject = {};<< {}It is also possible to use the Object constructor function:
constructedObject = new Object();<< {}A literal is still considered to be an instance of the Object constructor:
literalObject instanceof Object;<< trueSimilarly, the easiest way to create an array is to use the literal syntax, like so:
const literalArray = [1,2,3];<< [1, 2, 3]But an alternative is to use the Array constructor function:
constructedArray = new Array(1,2,3);<< [1, 2, 3]Array constructor functions exhibit some strange behavior regarding the arguments supplied, however. If only one argument is given, it doesn’t create an array with that argument as the first element, as you might expect. It sets the array’s length property instead, and returns an array full of undefined !
new Array(5); // you might expect [5]<< [undefined, undefined, undefined, undefined, undefined]This results in an error being thrown if a floating point decimal number is provided as an argument, because the length of an array must be an integer:
new Array(2.5);<< RangeError: Invalid array lengthThis behavior is another reason why it’s recommended to always use literals to create arrays.
ES6 Class Declarations
Before ES6, constructor functions were the only way of achieving class-like behavior in JavaScript.
ES6 introduced the newclass declarationsyntax that does exactly the same thing as a constructor function, but looks much similar to writing a class in a class-based programming language. Here is the dice example again, using a class declaration:
class Dice { constructor(sides=6) { this.sides = sides; } roll() { return Math.floor(this.sides * Math.random() + 1) }}Capitalizing Constructor Functions
By convention, the names of constructor functions or class declarations are capitalized, which is the convention used for classes in class-based programming languages.
To create an instance of the Dice class, the new operator is again used:
const blueDice = new Dice(20);<< Dice { sides: 20 }The variable blueDice now contains an instance of the Dice class and behaves in exactly the same way as the redDice object:
blueDice instanceof Dice<< trueblueDice.sides<< 20blueDice.roll()<< 13The class declaration syntax works in exactly the same way as the constructor function syntax, because it’s actually just syntactic sugar that is implemented in the same way in the background.
The ES6 class declarations are preferable to the constructor function syntax because they are more succinct, easier to read and all code in a class definition is implicitly in strict mode, so doesn’t need the ‘use strict’ statement. Using ES6 class declarations also avoids a number of pitfalls associated with constructor functions. For example, an error is thrown when trying to call a class constructor without using the new operator, whereas doing the same thing with a constructor function can cause a lot of problems that are hard to track down:
// Using constructor function - noDice is just set to undefined without any warningconst noDice = Dice();noDice<< undefined// Using class - an error is thrownconst noDice = Dice();<< TypeError: Class constructor Dice cannot be invoked without 'new'You can read more about ES6 Classes in thisarticle on SitePoint.
The Constructor Property
All objects have a constructor property that returns the constructor function that created it:
blueDice.constructor<< [Function: Dice]When an object literal is used to create a new object, we can see that in the background, the Object constructor function is being used:
const literalObject = {};<< {}literalObject.constructor<< [Function: Object]We can use the constructor property to instantiate a copy of an object, without having to reference the actual constructor function or class declaration directly. For example, if we wanted to make another copy of the redDice object, but if the name of its constructor was unknown, we could use the following:
const greenDice = new redDice.constructor(10);greenDice instanceOf Dice<< trueStatic Methods
The static keyword can be used in class declarations to create a static method. These are sometimes called class methods in other programming languages. A static method is called by the class directly rather than by instances of the class.
For example, the Dice class could have a method
class Dice { constructor(sides=6) { this.sides = sides; } roll() { return Math.floor(this.sides * Math.random() + 1) } static description() { return 'A way of choosing random numbers' }}This method is called from the Dice class like so:
Dice.description()<< 'A way of choosing random numbers'Static methods are not available to instances of the class. So, in our example, the instances of Dice such as redDice and blueDice cannot call the static description() method:
redDice.description<< TypeError: red.description is not a functionPrototypal Inheritance
JavaScript uses a prototypal inheritance model. This means that every class has a prototype property that is shared by every instance of the class. So any properties or methods of a class’s prototype can be accessed by every object instantiated by that class.
To see how this works, let’s create a class for creating ninja turtles:
class Turtle { constructor(name) { this.name = name; this.weapon = 'hands'; } sayHi() { return `Hi dude, my name is ${this.name}`; } attack(){ return `Feel the power of my ${this.weapon}!`; }}This can then be used to create a new turtle instance:
const leo = new Turtle('Leonardo');<< Turtle { name: 'Leonardo' }The variable leo points to an instance of the Turtle class. It has a name property and a sayHi() method that references the name property:
leo.name;<< 'Leonardo'leo.sayHi();<< 'Hi dude, my name is Leonardo'The Prototype Property
When creating a class, you would normally add any default properties and methods to the class declaration. But what if you want to augment the class with extra methods and properties after it has been created? It turns out that you can still do this using theprototypeproperty of the class. This is particularly useful if you don’t have access to the class declaration, but still want to add properties and methods to the class.
All classes and constructor functions have a prototype property that returns an object:
Turtle.prototype;<< Turtle {}All instances of the the Turtle class share all the properties and methods of its prototype. This means they can call any methods of the prototype and access any of its properties. Since the prototype is just an object, we can add new properties by assignment:
Turtle.prototype.weapon = 'Hands';<< 'Hands'We can also add a method to the prototype in a similar way:
Turtle.prototype.attack = function(){return `Feel the power of my ${this.weapon}!`;}<< [Function]Now if we create a new Turtle instance, we can see that it inherits the weapon property and attack() method from the Turtle.prototype object, as well as receiving the name property and sayHi() method from the class declaration:
const raph = new Turtle('Raphael');raph.name<< 'Raphael'raph.sayHi()<< 'Hi dude, my name is Raphael'raph.weapon<< 'Hands'raph.attack()<< 'Feel the power of my Hands!'Notice that there’s a reference to this.weapon in the prototype attack() method, and when the instance calls the attack() method, it uses the instance’s weapon property. This is because this in the prototype always refers to the instance that actually calls the method.
Finding Out the Prototype
There are a number of ways to find the prototype of an object. One way is to go via the constructor function’s prototype property:
raph.constructor.prototype;<< Turtle { attack: [Function], weapon: 'Hands' }Another way is to use the Object.getPrototypeOf() method, which takes the object as a parameter:
Object.getPrototypeOf(raph);<< Turtle { attack: [Function], weapon: 'Hands' }Many JavaScript engines also support the non-standard __proto__ property. This is known as dunder proto, which is short for ‘double underscore proto’:
raph.__proto__<< Turtle { attack: [Function], weapon: 'Hands' }The __proto__ property was formalized in ES6 because it was already implemented in most browsers, and many JavaScript libraries already used it. It is not considered part of the official specification, and it’s recommended that getPrototypeOf() is used instead.
The __proto__ property can also be used to set the prototype of an object by assignment, but its use has been deprecated in favor of the setPrototypeOf() method.
Every object also has a isPrototypeOf() method that returns a boolean to check if it’s the prototype of an instance:
Turtle.prototype.isPrototypeOf(raph)<< trueOwn Properties and Prototype Properties
In the previous example, the object raph had a name property that it inherited from the class declaration, and a weapon property that it inherited from the prototype property. The object raph has access to both these properties, but the name property is considered to be itsownproperty, while the weapon property is inherited from the prototype. Every object has a hasOwnProperty() method that can be used to check if a method is its own property, or is inherited from the prototype:
raph.hasOwnProperty('name');<< trueraph.hasOwnProperty('weapon');<< falseSo what’s the difference between an object’s own properties and prototype properties? Prototype properties are shared byeveryinstance of the Turtle class. This means they’ll all have a weapon property, and it will always be the same value. If we create another instance of the Turtle class, we’ll see that it also inherits a weapon property that has the same value of ‘Hands’:
const don = new Turtle('Donatello');<< Turtle { name: 'Donatello' }don.weapon;<< 'Hands'Every time an instance of the Turtle class queries the weapon property, it will return ‘Hands’. This value is the same for all the instances and only exists in one place ― as a property of the prototype. This means that it only exists in memory in one place, which is more efficient than each instance having its own value. This is particularly useful for any properties that are the same.
The Prototype Is Live!
The prototype object is live, so if a new property or method is added to the prototype, any instances of its class will inherit the new properties and methods automatically, even if that instance has already been created. For example, the raph object has a weapon property and attack() method that are inherited from Turtle.prototype . But the leo object that was createdbeforewe added these to the prototype will also have access to them:
leo.weapon;<< 'Hands'leo.attack();<< 'Feel the power of my Hands!'If we now change the value of the prototype’s weapon property, this will be reflected inallinstances of the Turtle class:
Turtle.prototype.weapon = 'Feet';<< 'Feet'leo.attack();<< 'Feel the power of my Feet!'raph.attack();<< 'Feel the power of my Feet!'don.attack();<< 'Feel the power of my Feet!'Overwriting a Prototype
It is not possible to overwrite the prototype by assigning it to a new object literal if class declarations are used:
Turtle.prototype = {}<< {}Even though it looks like the prototype has been reassigned to an empty object literal, we can see see it hasn’t actually changed:
Turtle.prototype<< Turtle { attack: [Function], weapon: 'Feet' }Itispossible to do this if constructor functions are used, and it can cause a lot of headaches if you accidentally redefine the prototype. This is because any instances that have already been created will retain the properties and methods of the old prototype, but will not receive any of the new properties and methods that are subsequently added to the redefined prototype.
This is another reason why it’s recommended to use class declarations instead of constructor functions.
Overwriting Prototype Properties
An object instance can overwrite any properties or methods inherited from its prototype by simply assigning a new value to them. For example, we can give our turtles their own weapon properties:
leo.weapon = 'Katana Blades';<< 'Katana Blades';raph.weapon = 'Sai';<< 'Sai'don.weapon = 'Bo Staff';<< 'Bo Staff'These properties will now become an ‘own property’ of the instance object:
leo<< Turtle { name: 'Leonardo', weapon: 'Katana Blades' }Any own properties will take precedence over the same prototype property when used in methods:
leo.attack();<< 'Feel the power of my Katana Blades!'When a property or method is called, the JavaScript engine will check to see if an object has its own property or method. If it does, it will use that one; otherwise, it will continue up the prototype chain until it finds a match or reaches the top of the chain.
What Should the Prototype Be Used For?
The prototype can be used to add any new properties and methods after the class has been declared. It should be used to define any properties that will remain the same for every instance of the class. The weapon example was unsuitable because all the turtles use a different weapon (we just used it in the example above to demonstrate overwriting). They do, however, like the same food — pizza! This makes a good candidate for a prototype property, if it wasn’t included in the original class declaration:
Turtle.prototype.food = 'Pizza';Methods are likely to be the same for all instances of a constructor, so it’s fine to add methods to the prototype:
Turtle.prototype.eat = function() { return 'Mmm, this ${this.food} tastes great!';}Use With Care When Setting Default Values
Be careful when using the prototype to set default values. They are shallow, (There’s more about shallow and deep copies later in the chapter.) so any changes to an array or object made by an instance will be reflected in the prototype, and therefore shared between all instances.
A golden rule to remember is:Never use arrays or objects as a default value in prototype.
This is not a problem if arrays or objects are set as default values from within the constructor function in the class declaration.
To summarize, the following points should be considered when using classes and prototypes to create instances:
- Create a class declaration that deals with any initialization, shared properties and methods.
- Any extra methods and properties that need to be augmented to the class declaration after it’s been defined can be added to the prototype. These will be added toallinstances, even those that have already been created.
- Add any properties or methods that are individual to a particular instance can be augmented using assignment to that object (a mixin could be used to add multiple properties at once, as we’ll see later).
- Be careful when overwriting the prototype completely ― the constructor class needs to be reset.
To demonstrate, let’s create another Turtle instance. Use the class constructor to initialize an instance:
const mike = new Turtle('Michelangelo');Verify that the new instance has inherited properties and methods from the prototype:
mike.eat();<< 'Mmm, this Pizza tastes great!'Augment the instance with its own individual weapon property:
mike.weapon = 'Nunchakus';<< 'Nunchuks'mike.attack();<< 'Feel the power of my Nunchakus!'Totally awesome!
Public and Private Methods
By default, an object’s methods are public in JavaScript. Methods and properties are said to be public because they can be queried directly and changed by assignment. The dynamic nature of the language means that an object’s properties and methods can be changed after it has been created.
In our Ninja Turtle example, the name and weapon properties are said to be public, as can be seen if we query their value:
raph.weapon<< 'Sai'This means they can also be changed to any value, using assignment:
raph.weapon = 3;<< 3This is something you may want to avoid if your objects are public facing ― giving users or external services too much access to properties and methods could be a recipe for disaster!
Fortunately, we can use the concept of variable scope to keep some properties and methods private inside of a class declaration. This will prevent them from being accessed or changed. Instead, we will provide a getter method to return the values of any private properties.
In the example that follows, the Turtle() class has been modified to include a private _color property (some of the other properties and methods have also been removed for clarity):
class Turtle { constructor(name,color) { this.name = name; let _color = color; this.setColor = color => { return _color = color; } this.getColor = () => _color; }}The _color property is created as a variable inside the scope of the constructor function inside the class declaration. This makes it impossible to access outside of this scope. The getColor() and setColor() methods are known asgetter and setter methodsand they form a closure over this variable and provide controlled access to the property instead:
raph = new Turtle('Raphael','Red');<< Turtle { name: 'Raphael', setColor: [Function], getColor: [Function] }raph.getColor();<< 'Red'raph.setColor(4);<< 4In this example, things don’t work much differently than before, except functions are now being used to access and change the private properties. The big change, however, is that now we have full control over the getter and setter methods. This means that any private properties can only be changed in acontrolledway, so we can stop certain assignments from being made by screening the data before any changes are made to a private property. For example, we could insist that the color property is a string:
this.setColor = (color) => {if(typeof color === 'string'){ return _color = color; } else { throw new Error('Color must be a string'); }}raph.setColor(4);<< Error: Color must be a stringInheritance
The examples we’ve seen so far have all demonstrated inheritance by inheriting properties and methods from the prototype. But the prototype is just another object, so it also has its own prototype, which in turn has its own prototype… and so on, creating a chain of inheritance.
The Prototype Chain
We can see an example of a prototype chain by looking at the prototype of the raph instance of the Turtle class that we created in the last section, using the Object.getPrototypeOf() method:
Object.getPrototypeOf(raph)<< Turtle {}We can peer further down the prototype chain, but calling the Object.getPrototypeOf() method recursively. This shows us that the prototype of the prototype is an apparently empty object literal, although it’s actually an instance of the built-in Object() constructor function (more about this in the next section):
Object.getPrototypeOf(Object.getPrototypeOf(raph))<< {}If we try find the next prototype, we receive null :
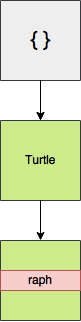
Object.getPrototypeOf(Object.getPrototypeOf(Object.getPrototypeOf(raph)))<< nullThis is the end of the prototype chain for our Turtle instance, and shows that all prototype chains end at the Object() constructor function. This can be seen in the diagram below:
The Object Constructor
As we saw in the last example, all objects ultimately inherit from the prototype of the Object() constructor function.
When an object calls a method, the JavaScript engine will check to see if the object has that method. If it doesn’t, it will check if the object’s prototype has the method. If not, it will check whether the prototype’s prototype has it. This continues all the way up the prototype chain, until it reaches the prototype of the Object() constructor function, from which all objects in JavaScript inherit. If the prototype of Object() is without the method, an error will be returned saying the object doesn’t exist:
raph.makePizza();<< TypeError: raph.makePizza is not a functionBut in the prototype chain example, Object.prototype was displayed as an empty object, so it has no methods — right? Er, actually, that’s not the case.
The prototype of the Object constructor function has a large number of methods that are inherited by all objects. The reason why the prototype appears as an empty object literal is because all of its methods are not enumerable.
Enumerable Properties
Properties of objects in JavaScript are said to beenumerableornon-enumerable. If they aren’t enumerable, this means they will not show up when a for-in loop is used to loop through an object’s properties and methods.
There is a method called propertyIsEnumerable() that every object has (because it’s a method of Object.prototype ) that can be used to check if a property is enumerable. We can see in the following example that the eat() method we created earlier is enumerable (in fact, all properties and methods that are created by assignment are enumerable):
Turtle.prototype.propertyIsEnumerable('eat');<< trueAll objects inherit a toString() method from Object.prototype , but it’s not enumerable, so it won’t show up in any objects:
Object.prototype.propertyIsEnumerable('toString');<< falseIn fact, the propertyIsEnumerable() method can be used to show that it isn’t, itself, enumerable:
Object.prototype.propertyIsEnumerable('propertyIsEnumerable');<< falseGood practice is for all built-in methods to be non-enumerable, and any user-defined methods to be made enumerable. This is so all the built-in methods don’t keep showing up when looking at an object’s methods, but user-defined methods are easy to find.
Inheritance Using extends
A class can inherit from another class using the extends keyword in a class declaration.
For example, say we decided to start again with our Turtle class as:
class Turtle { constructor(name) { this.name = name; } sayHi() { return `Hi dude, my name is ${this.name}`; } swim() { return `${this.name} paddles in the water`; }}This class declaration is similar to before, and defines properties and methods for anormalturtle. In our previous example, we then started adding more specific properties such as weapons that don’t really apply to normal turtles, they are forninja turtles. Instead of polluting the Turtle class with these properties, it would be a good idea to create asub-classorchild classof the Turtle class called ninjaTurtle. This is created in a similar fashion, using a class declaration, but notice the use of the extends keyword:
class NinjaTurtle extends Turtle { constructor(name) { super(name); this.weapon = 'hands'; } attack() { return `Feel the power of my ${this.weapon}!` } }Inside the child class declaration, the keyword super refers to the parent class, and can be used to access any properties and call any methods of the parent class. In the example above we use it to call the constructor function of the Turtle class.
Polymorphism
The concept of polymorphism means that different objects can have the same method, but implement it in different ways. The Object.prototype object has a toString() method that is shared by all objects. This means every object created in JavaScript will have a toString() method. Polymorphism means that objects are able to override this method with a more specific implementation. So although every object has a toString() method, the way it’s implemented can vary between different objects. For example, calling it on an array object will return each value in a comma-separated string:
[1,2,3].toString()<< '1,2,3'Calling it on a primitive number will return a string containing that number:
2..toString; // remember 2 dot operators for integers!<< '2'Numbers, Strings, and Booleans
The number, string, and boolean primitive types that we met way back in Chapter 2 have their own corresponding constructor functions: Number , String , and Boolean respectively.
Rather bizarrely, though, these constructors don’t produce primitive values:
new Number(2); // the return value looks like a primitive<< 2;typeof Number(2); // but it's actually an object!<< "object"Similarly, primitive values are not instances of these constructor functions:
2 instanceof Number;<< falseIn fact, the two things are not strictly equal:
Number(2) === 2;<< falsePrimitives are actually without their own methods. The primitive wrapper objects Number , String , and Boolean are used in the background to provide primitive values with methods. When a method is called on a primitive value, JavaScript creates a wrapper object for the primitive, which converts it into an object and then calls the method on the object. This means it’s possible to call methods on primitives, as we saw in Chapter 2:
2..toExponential();<< '2e+0'In the background, something similar to this is happening:
new Number(2).toExponential();<< '2e+0'Even custom objects, such as the Turtle objects we created earlier, have a toString() method:
raph.toString();<< '[object Object]'It may convey little information, but it does return a string representation of the object.
The toString() method is used by a number of built-in functions in the background. It can be used without fear of causing an error becauseeveryobject has the method, as it’s inherited from Object.prototype .
One example of a function that uses the toString() method is the console.log() method. If an object is given as an argument to this method that isn’t a string, it will call toString() on that object in the background and display the return value in the console. For example, the code:
console.log([1,2,3]);<< [ 1, 2, 3 ]It’s often a useful exercise to override the toString() method using the prototype, so something more meaningful is displayed. For example, we could edit the Turtle() class declaration so it includes a more descriptive toString() method:
class Turtle { // other turtle methods here toString() { return `A turtle called ${this.name}`; }}raph.toString();<< 'A turtle called Raphael'The toString() method is a good demonstration of polymorphism, since different objects have the same method but implement it differently. The advantage of this is that higher-level functions are able to call a single method, even though it may be implemented in various ways.
Adding Methods to Built-in Objects
It is possible to add more methods to the prototype of JavaScript’s built-in objects — such as Number , String , and Array — to add more functionality. This practice is known asmonkey-patching, but it’s mostly frowned upon in the JavaScript community, despite it being an incredibly powerful technique (The Ruby programming community, on the other hand, generally embrace monkey-patching, so it is quite common in Ruby code examples.) .
As an example, we can add isOdd() and isEven() methods to the Number wrapper object’s prototype. These methods will then be available to number primitives:
Number.prototype.isEven = function() { return this%2 === 0;}Number.prototype.isOdd = function() { return this%2 === 1;}We can try a few more examples to check that these work:
42..isEven();<< true765234..isOdd();<< falseArrays are powerful objects, but seem to have some basic methods missing in JavaScript that are found in other languages. We can add a first() and last() methods that return the first and last items in the array:
Array.prototype.first = function() { return this[0];}Array.prototype.last = function() { return this[this.length -1];}Again, we can check that these work with a couple of examples:
const turtles = ['Leonardo', 'Donatello', Michaelangelo', 'Raphael'];turtles.first();<< 'Leonardo'turtles.last();<< 'Raphael'Another useful method that arrays lack is a decent delete() method. There is the delete operator that we met in Chapter 3, but the way this works is not very intuitive as it leaves a value of null in place of the item that’s removed. In that chapter, we saw that it’s possible to remove an item completely from an array using the splice() method. We can use this to create a new method called delete() that removes an item from the array at the index provided:
Array.prototype.delete = function(i) { return self.splice(i,1);}A useful example of monkey-patching is to add support for methods that are part of the specification, but not supported natively in some browsers. An example is the trim() method, which is a method of String.prototype , so all strings should inherit it. It removes all whitespace from the beginning and the end of strings, but unfortunately this method is not implemented in Internet Explorer version 8 or below. This can be rectified using this polyfill code that will use the built in String.prototype.trim if it exists, and if it doesn’t, it monkey-patches the String prototype with the function provided (this is because of lazy evaluation when using the || operator):
String.prototype.trim = String.prototype.trim || function() { return this.replace(/^\s+|\s+$/,''); }' hello '.trim();<< 'hello'While monkey-patching built-in objects can seem a good way to add extra or missing functionality, it can also add unexpected behavior. The current consensus in the JS community is that this shouldn’t be done, so you should avoid monkey-patching any of the built-in object constructor prototypes, unless you have a very good reason. Further problems could occur if the method you’ve added is then implemented natively in the language.
If you do decide to do it, the suggested way is to check for built-in methods first then try to mimic the built-in functionality from the specification, like in the trim() polyfill shown above. This can still be problematic, though, if the specification changes and is different from your implementation. Remember also that you can never guarantee a method won’t be implemented at some point in the future.
You can read more about monkey-patching in thisarticle on SitePoint.
An alternative way to avoid causing problems is to use extends to subclass a built class and create your own class. For example, you could create your own array class by extending the built in array class, like so:
class myArray extends Array { constructor(...args){ super(...args); } delete(i) { return this.splice(i,1); }}To create one of your new array objects, use the new keyword:
const list = new myArray(1,2,3); << myArray [ 1,2,3 ]Now we can check that our delete() method works:
list.delete(1);myArray [ 2 ]list<< myArray [ 1, 3 ]An obvious problem with this is that you would have to use this more unwieldy syntax instead of array literals, although it has the advantage of not interfering with the built-in array class at all.
Property Attributes and Descriptors
We’ve already seen that all objects are collections of key-value paired properties. It turns out that each property has a number of attributes that provide information about the property. These attributes are stored in a property descriptor, which is an object that contains values of each attribute.
All object properties have the following attributes stored in a property descriptor:
-
value― This is the value of the property and isundefinedby default -
writable― This boolean value shows whether a property can be changed or not, and is false by default -
enumerable― this boolean value shows whether a property will show up when the object is displayed in afor inloop, and isfalseby default -
configurable― this boolean value shows whether you can delete a property or change any of its attributes, and isfalseby default.
So far, we’ve just set properties by assignment, which only allows you to set the value attribute of the property. It’s also possible to set each of the property attributes by using a property descriptor. For example, consider the following object, which has the single property of name :
const me = { name: 'DAZ' };The property descriptor for the name property might look like this:
{ value: 'DAZ', writable: true, enumerable: true, configurable: true }We’ve already seen how to add more properties by assignment:
me.age = 21;<< 21The disadvantage with this is that it can only be used to set the value attribute of the property. In this case the value attribute of the age property has been set (rather optimistically) as 21. But it’s not possible to set the writable , enumerable , and configurable attributes in this manner. These will be set as true when an assignment is made. Note that these are the exact opposite of the default values for those attributes.
Getting and Setting Property Descriptors
The Object() constructor function has a number of methods for getting and defining property descriptors. We can see these values using the Object.getOwnPropertyDescriptor() method:
Object.getOwnPropertyDescriptor(me,'name');<< { value: 'DAZ',writable: true,enumerable: true,configurable: true }Instead of using assignment, we can add properties to an object using the Object.defineProperty() method. This provides more fine-grained control when adding new properties, as it allows each attribute to be set. The first argument is the object to which you want to add the property, followed by a property descriptor containing the attributes you want to set. Any attributes left out will take the default values:
Object.defineProperty(me, 'eyeColor', { value: 'blue', writable: false, enumerable: true }); << { name: 'DAZ', age: 21, eyeColor: 'blue' }As you can see, the object is returned with the new property added. The example above has created a property called eyeColor that is effectively read-only (because the writable attribute was set to false). If we try to change it by assignment, it will look as if it has changed:
me.eyeColor = 'purple'<< 'purple'But in reality, it hasn’t:
me.eyeColor<< 'blue'Getters and Setters
An object property descriptor can have get() and set() methods instead of a value attribute. All objects must have one or the other, they can’t have both. The get() and set() methods can be used to control how a property is set using assignment and the value that is returned when a property is queried.
They are particularly useful if a property relies on the value of another property.
For example, if we add age and retirementAge properties to the me object, we can then create a yearsToRetirement property that depends on these properties:
me.age = 21;me.retirementAge = 65;Object.defineProperty(me, 'yearsToRetirement',{ get() { if(this.age > this.retirementAge) { return 0; } else { return this.retirementAge - this.age; } }, set(value) { this.age = this.retirementAge - value; return value; }});The getter bases the yearsToRetirement property on the age and retirementAge properties, so returns the relevant value when queried:
me.yearsToRetirement<< 44The setter also allows the age to be changed by setting the yearsToRetirement property:
me.yearsToRetirement = 10;<< 10me.age<< 55These getter and setter methods allow much more fine-grained control over how assignment works. It also means we can change the way assignment works, and use the get() method to return anything we like, regardless of what value was set using assignment. For example, we could change the property to the following in a bid to stay forever young:
Object.defineProperty(me, 'age', { get() { return 21; }, set(value) { return value; }});If we test this out, we can see that querying the property always returns 21, despite it appearing to be assigned to different values:
me.age = 30;<< 30me.age<< 21The get and set property descriptors are particularly useful for controlling the getting and setting of properties in classes.
The next example shows how we can create a Dice class that uses a get function that will return a description of the number of sides, rather than just the actual number, and a set function that prohibits a non-positive number of sides to be set:
class Dice {constructor(sides=6){ Object.defineProperty(this, 'sides', { get() { return `This dice has ${sides} sides`; }, set(value) { if(value > 0) { sides = value; return sides; } else { throw new Error('The number of sides must be positive'); } } }); this.roll = function() { return Math.floor(sides * Math.random() + 1) } }}The number of sides can now be assigned in the usual way, but it will act a little differently:
const yellowDice = new Dice;yellowDice.sides<< "This dice has 6 sides"yellowDice.sides = 10;<< 10yellowDice.sides<< "This dice has 10 sides"yellowDice.sides = 0;<< Error: "The number of sides must be positive"These getter and setter methods give you much more power in controlling the way property assignment works. However, they should be used sparingly and with care, as changing the expected behavior of an assignment has the potential to cause a lot of confusion.
Creating Objects from Other Objects
It’s possible to avoid using classes altogether, and create new objects based on another object that acts as a ‘blueprint’ or prototype instead.
The Object() constructor function has a method called create that can be used to create a new object that is an exact copy of the object that is provided as an argument. The object that is provided as the argument acts as the prototype for the new object.
For example, we can create a Human object that will form the basis for other Human objects. This is simply created as an object literal:
const Human = {arms: 2,legs: 2,walk() { console.log('Walking'); }}This will act as the prototype for all other Human objects. Its name is capitalized as it acts in a similar way to a class in class-based programming languages, and it’s only used to create Human objects. It should follow the same rules for prototypes that we saw earlier ― it will contain all the methods that Human objects have, as well as any properties that won’t change very often. In this case, the properties are arms and legs , and the method is walk() .
We can create an instance of Human using the Object.create() method:
const lois = Object.create(Human);This will create a new object that inherits all the properties and methods from the Human object:
lois.arms<< 2lois.legs<< 2lois.walk()<< WalkingThis is because the Human object is the prototype of the lois object:
Human.isPrototypeOf(lois);<< trueExtra properties can then be added to each instance using assignment:
lois.name = 'Lois Lane';<< 'Lois Lane'lois.job = 'Reporter';<< 'Reporter'An alternative way is to add a second argument to the Object.create() method containing properties that are to be added to the new object:
const jimmy = Object.create(Human, { name: { value: 'Jimmy Olsen', enumerable: true }, job: { value: 'Photographer', enumerable: true } });This method is a little unwieldy as the properties have to be added using property descriptors, making the syntax awkward and overly verbose. It’s often easier to create the object, then add each new property one by one. This can be made quicker using the mixin() function that is covered later.
The Human Object Is a Prototype
The Human object will be the prototype for any objects created using it as an argument and remember that prototypes are live. This means that any changes made to the Human object will be reflected in all the objects created this way.
Object-Based Inheritance
The Human object can also act like a ‘super-class’, and become the prototype of another object called Superhuman . This will have all the properties and methods that the Human object has, but with some extra methods:
const Superhuman = Object.create(Human);Superhuman.change = function() {return `${this.realName} goes into a phone box and comes out as ${this.name}!`;};This method relies on the name and realName properties. It can be a good idea to create default values in the prototype so the method will still work. In this case, we can use names that prompt some real data to be added:
Superhuman.name = 'Name Needed';<< 'Name Needed'Superhuman.realName = 'Real Name Needed';<< 'Real Name Needed'Now we can use the Superhuman object as a prototype to create more objects based on it:
const superman = Object.create(Superhuman);Once a Superhuman object has been created, we can overwrite the default properties by assignment:
superman.name = 'Superman';superman.realName = 'Clark Kent';Now we can see that it has inherited the change() method from the Superhuman object:
superman.change()<< Clark Kent goes into a phone box and comes out as Superman!This method of adding custom properties is certainly more long-winded than using a constructor function, where the initial values are passed as an argument to the constructor function. This can be fixed by adding a init() method to the Superhuman object that accepts initialization properties:
Superhuman.init = function(name,realName){ this.name = name; this.realName = realName; this.init = undefined; // this line removes the init function, so it can only be called once return this;}Now a new object can easily be created and initialized:
const batman = Object.create(Superhuman);batman.init('Batman','Bruce Wayne');batman.change();<< 'Bruce Wayne goes into a phone box and comes out as Batman!'A new object can also be created and initialized in a single line by adding the call to the init() method at the end of the line that creates the object. This is an example ofchaining(a technique that will be explained in more detail later in the chapter):
const aquaman = Object.create(Superhuman).init('Aquaman', 'Arthur Curry');aquaman.change();<< 'Arthur Curry goes into a phone box and comes out as Aquaman!'Object Prototype Chain
Creating objects from objects will create a prototype chain.
Every time a new object is created using the Object.create() method, the new object inherits all the properties and methods from the parent object, which becomes the new object’s prototype. For example, we can see that the prototype of the superman object is the Superhuman object using this code:
Superhuman.isPrototypeOf(superman);<< trueAnd we can also see that the prototype of the Superhuman object is the Human object:
Human.isPrototypeOf(Superhuman);<< trueAdditionally, we can verify that the Superhuman object is the prototype of any other objects created using it:
Superhuman.isPrototypeOf(batman);<< trueThe instanceof Operator Won’t Work Here
The instanceof operator will not work when objects have been created this way. It only works when using constructor functions to create objects.
This produces the chain of inheritance shown in the diagram below:
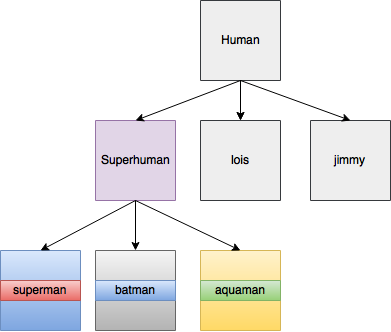
Because of this chain, the superman object has all the properties and methods of the Human and Superhuman objects:
superman.walk();<< Walkingsuperman.change();<< 'Clark Kent goes into a phone box and comes out as Superman!'Mixins
A mixin is a way of adding properties and methods of some objects to another object without using inheritance. It allows more complex objects to be created by ‘mixing’ basic objects together.
Basic mixin functionality is provided by the Object.assign() method. This will assign to the object provided as the first argument all of the properties from any objects provided as further arguments:
const a = {};const b = { name: 'JavaScript' };Object.assign(a,b);<< { name: 'JavaScript' }a.name<< 'JavaScript'There is a problem with this method, however. If any of the properties being mixed in are arrays or nested objects, only a shallow copy is made, which can cause a variety of issues (see note).
Copying By Reference
When objects are copied by assignment, they are only copied by reference. This means that another object is not actually created in memory; the new reference will just point to the old object. Any changes that are made to either objects will affect both of them. Arrays and functions are objects, so whenever they’re copied by assignment they will just point to the same object. And when one changes, they all change. This is known as making a shallow copy of an object. A deep or hard copy will create a completely new object that has all the same properties as the old object. The difference is that when a hard copy is changed, the original remains the same. But when a shallow copy is changed, the original changes too.
This affects our mixin function when we try to copy a property that is an array or object, as can be seen in this example:
const a = {};const b = { numbers: [1,2,3] };Object.assign(a,b);<< { numbers: [1,2,3] } a now has a reference to the numbers property in the b object, rather than its own copy. Any changes made to either object will affect them both:
b.numbers.push(4);<< 4b.numbers<< [1,2,3,4]a.numbers // This has also changed<< [1,2,3,4]To avoid only a shallow copy, we’re going to create our own mixin() function that will assign all properties of an object to another object as adeepcopy.
This means thateveryobject will inherit this method and be able to use it to augment itself with the properties and methods from other objects.
function mixin(target,...objects) { for (const object of objects) { if(typeof object === 'object') { for (const key of Object.keys(object)) { if (typeof object[key] === 'object') { target[key] = Array.isArray(object[key]) ? [] : {}; mixin(target[key],object[key]); } else { Object.assign(target,object); } } } } return target;}This code looks very complicated at first glance, so let’s dive into it and see what’s happening.
The first parameter is the object that we are applying the mixin to. The second parameter uses the rest parameter ...objects to allow multiple objects to be ‘mixed in’ at once. These will be available in the function as an array called objects .
We then use a for-of loop to iterate through each object in this array.
Next we iterate through each property in the object using the Object.keys() iterable.
The next line is the important part that ensures a deep copy. The problematic properties that are not deep copied are arrays and objects. Both of these return ‘object’ when the typeof operator is used. If that is the case, we need to do something different than just use Object.assign() to copy the property.
If the property is an object, we use a ternary operator to check whether it is an array or an object using the Array.isArray() method. If it is an array, then its constructor function will be Array . We create a new array literal, otherwise we create a new object literal.
Then we apply the mixin method recursively to add each property one at a time to the literal that was just created, instead of just using assignment.
And finally, the else statement states that Object.assign should still be used for any properties that are not arrays or objects because a shallow copy will work fine for those.
Let’s test this to see if it makes a deep copy:
const a = {}, b = { foo: 'bar' }, c = { numbers: [1,2,3] };mixin(a,b,c);<< { foo: 'bar', numbers: [ 1, 2, 3 ] }c.numbers.push(4);<< 4a.numbers<< [ 1, 2, 3 ]c.numbers<< [ 1, 2, 3, 4]It works as expected ― all the properties from the objects b and c are mixed into the object a , and the array numbers is not copied by reference ― any changes to it only affect the object they are acted on.
The mixin() function is a particularly powerful way of dealing with objects, and has a number of uses.
Using Mixins to Add Properties
One use for the mixin() function is to add a large number of properties to an object all at once. For example, we can instantiate a new Superhuman object, then add all its individual properties in one go, instead of one at a time, as we did earlier, while avoiding having to use the more verbose property descriptor notation:
const wonderWoman = Object.create(Superhuman);Instead of assigning each property, one at a time:
wonderWoman.name = 'Wonder Woman';<< 'Wonder Woman'wonderWoman.realName = 'Diana Prince';<< 'Diana Prince'We can just mix in an object literal and add both properties at once:
mixin(wonderWoman,{ name: 'Wonder Woman', realName: 'Diana Prince' });wonderWoman.change()<< 'Diana Prince goes into a phone box and comes out as Wonder Woman'Using Mixins to Create a copy() Function
Another use of the mixin() function is to create a copy() method that can be used to make an exact, deep copy of an object:
function copy(target) { const object = Object.create(Object.getPrototypeOf(target)); mixin(object,target); return object;}The copy function also takes a parameter called target , which is the object to be copied. The first thing we do is create a new object based on the prototype of the object that we are copying.
The mixin() function is then used to add all the properties and methods of the object to this new object, effectively making an exact copy of itself.
We can now use this function to make exact copies of objects, as demonstrated below with a clone of the superman object:
const bizarro = copy(superman);bizarro.name = 'Bizarro';<< 'Bizarro';bizarro.realName = 'Subject B-0';<< 'Subject B-0'bizarro.change()<< 'Subject B-0 goes into a phone box and comes out as Bizzaro!'Note that this is a deep copy and isn’t copied by reference, so any subsequent changes to the superman or bizarro objects will not affect the other.
Factory Functions
Our copy() function can now be used to create afactory functionfor superheroes. A factory function is a function that can be used to return an object.
Our factory function will be based on the Superhuman object:
function createSuperhuman(...mixins) { const object = copy(Superhuman); return mixin(object,...mixins);}This uses our copy() function to make a copy of the Superhuman object, then uses the mixin() function to augment any properties and methods of any objects that are provided as arguments. These properties and methods overwrite any default properties of the superHuman object. This allows us to provide an initialization object literal as an argument:
const hulk = createSuperhuman({name: 'Hulk', realName: 'Bruce Banner'});hulk.change()<< 'Bruce Banner goes into a phone box and comes out as Hulk!'The createSuperhuman() function is an example of a factory function that can now be used to create as many superhuman objects as required.
You can read more about factory functions inthis article on SitePoint.
Using the Mixin Function to Add Modular Functionality
Inheritance allows us to add functionality to objects by inheriting properties and methods from other objects. While this is useful, it can be undesirable to create a chain of inheritance ― sometimes we just want to add properties and methods without linking the two objects together. The mixin() function lets us encapsulate properties and methods in an object, then add them to other objects without the overhead of an inheritance chain being created.
One way to think about the difference between prototypal inheritance and inheritance from mixin objects is to consider whether an objectissomething or whether ithassomething. For example, a tankis avehicle, so it might inherit from a Vehicle prototype. The tank alsohas agun, so this functionality could be added using a gun mixin object. This gives us extra flexibility, since other objects might also use a gun, but not be a vehicle, such as a soldier object, for example. The soldier object might inherit from a Human prototype and also have the gun mixin.
We can use this idea to add superpowers to our superhero objects used earlier. All the superheroes are super human, so they inherited any common traits from a Superhuman prototype. But they also have superpowers, and each superhero has a different mix of powers. This is a perfect use case for mixin objects: we can create some superpower mixin objects that can then be added to any of our superhero objects as required.
Here are some examples of superpowered mixin objects:
const flight = { fly() { console.log(`Up, up and away! ${this.name} soars through the air!`); return this; }}const superSpeed = { move() { console.log(`${this.name} can move faster than a speeding bullet!`); return this; } }const xRayVision = { xray() { console.log(`${this.name} can see right through you!`); return this; } }Returning this
Each of the mixins above has a return value of this ― you’ll see why a littler later in the chapter!
Now we can add the relevant superpowers to each object in a modular fashion using the mixin() function:
mixin(superman,flight,superSpeed,xRayVision);mixin(wonderwoman,flight,superSpeed);Now we can see they have gained some extra methods:
superman.xray();<< 'Superman can see right through you!'wonderWoman.fly();<< 'Up, up and away! Wonder Woman soars through the air!'We can also add the mixins as an argument to the createSuperhero() factory function that we made earlier to create a superhero object with all the relevant methods from the start:
const flash = createSuperhuman({ name: 'Flash', realName: 'Barry Allen' }, superSpeed);In one assignment we have created a superhero object that’s inherited all the default properties from the Superhuman object, has the correct name details and any relevant powers:
flash.change()<< 'Barry Allen goes into a phone box and comes out as Flash!'flash.move()<< Flash can move faster than a speeding bullet!Chaining Functions
If a method returns this , its methods can be chained together to form a sequence of method calls that are called one after the other. For example, the superman object can call all three of the superpower methods at once:
superman.fly().move().xray();<< Up, up and away! Superman soars through the air! Superman can move faster than a speeding bullet! Superman can see right through you!This is a technique that is commonly used by a number of JavaScript libraries, most notably jQuery. It helps to make code more concise by keeping multiple method calls on the same line, and with some clever method naming it can make the calls read almost like a sentence; the Jest testing library that we used in Chapter 10 makes use of this.
A big drawback with this technique is that it can make code more difficult to debug. If an error is reported as occurring on a particular line, there is no way of knowing which method caused the error, since there are multiple method calls on that line.
It’s worth keeping in mind that if a method lacks a meaningful return value, it might as well return this so that chaining is possible.
Binding this
We saw earlier that the value of this points to the object calling a method. It allows us to create generalized methods that refer to properties specific to a particular object. Be aware of a certain problem when a function is nested inside another function, which can often happen when using methods in objects, especially ones that accept callback functions. The problem is that the value of this loses its scope, and points to the global object inside a nested function, as can be seen in this example:
superman.friends = [batman,wonderWoman,aquaman]superman.findFriends = function(){ this.friends.forEach(function(friend) { console.log(`${friend.name} is friends with ${this.name}`); } );}superman.findFriends()<< Batman is friends with undefined Wonder Woman is friends with undefined Aquaman is friends with undefinedThe findFriends() method fails to produce the expected output because this.name is actually referencing the name property of the global window object, which has the value of undefined .
There are a couple of solutions to this problem.
Use that = this
A common solution is to set the variable that to equal this beforethe nested function, and refer to that in the nested function instead of this . Here is the example again, using that :
superman.findFriends = function(){ const that = this; this.friends.forEach(function(friend) { console.log(`${friend.name} is friends with ${that.name}`); } );}superman.findFriends();<< Batman is friends with Superman Wonder Woman is friends with Superman Aquaman is friends with SupermanYou might also see self or _this used to maintain scope in the same way.
Use bind(this)
The bind() method is a method for all functions and is used to set the value of this in the function. If this is provided as an argument to bind() while it’s still in scope, any reference to this inside the nested function will be bound to the object calling the original method:
superman.findFriends = function() { this.friends.forEach(function(friend) { console.log(`${friend.name} is friends with ${this.name}`); }.bind(this);)}superman.findFriends();<< Batman is friends with Superman Wonder Woman is friends with Superman Aquaman is friends with SupermanUse for-of Instead Of forEach()
ES6 introduced the for-of syntax for arrays and this does not require a nested function to be used, so this remains bound to the superman object:
superman.findFriends = function() { for(const friend of this.friends) { console.log(`${friend.name} is friends with ${this.name}`); };}superman.findFriends();<< Batman is friends with Superman Wonder Woman is friends with Superman Aquaman is friends with SupermanUse Arrow Functions
Arrow functions were introduced in ES6, and one of the advantages of using them is that they don’t have their own this context, so this remains bound to the original object making the function call:
superman.findFriends = function() { this.friends.forEach((friend) => { console.log(`${friend.name} is friends with ${this.name}`); } );}superman.findFriends();<< Batman is friends with Superman Wonder Woman is friends with Superman Aquaman is friends with SupermanFor this reason, arrow functions should be used when anonymous functions are required in callbacks (and they require less typing as well!)
Borrowing Methods from Prototypes
It’s possible to borrow methods from objects without having to inherit all their properties and methods. This is done by making a reference to the function that you want to borrow (that is, without parentheses so that it isn’t invoked).
For example, the batman object doesn’t have any of the superpower methods that the superman object has, but we can create a reference to them that can then be used by another object. For example, we can create a fly() function by referencing the superman object’s fly method:
const fly = superman.fly;<<This method can now be called on another object using the call method that all functions have, and that we learned about in Chapter 11:
fly.call(batman);<< Up, up and away! Batman soars through the air!Borrowing Array Methods
One of the most common uses of borrowing methods was to borrow methods from arrays in ES5. There are manyarray-likeobjects in JavaScript, such as the arguments object that’s available in functions, and the node lists that many of the DOM methods return. These act like arrays but are missing a lot of the methods arrays have — often it would be convenient if they had them.
For example, the arguments object can use the slice() method from the Array constructor’s prototype by assigning a variable that points to it:
const slice = Array.prototype.slice;This method can then be called on the arguments object using the call() method:
slice.call(arguments, 1, 3);The call() method takes the object that the function is to be applied to as its first argument, then the usual arguments come afterwards.
The method can also be borrowed directly from an array literal, like so:
[].slice.call(arguments, 1, 3)An array-like object can effectively be turned into an array using the slice() method with no arguments:
const argumentsArray = Array.prototype.slice.call(arguments);This will return the arguments object as an array (since the slice() method returns an array).
Most of these techniques are not needed from ES6 onwards as the Array.from() method can be used to turn an array-like object into an array:
const argumentsArray = Array.from(arguments);Alternatively, the spread operator can be used to easily turn an array-like object into an array like so:
const argumentsArray = [...arguments];You will still see a lot of the ‘array method borrowing’ techniques used in the wild, and transpilers also use these techniques to replicate ES6 functionality.
Composition Over Inheritance
There are a number of benefits to object-oriented programming, but there are also some problems that come with inheritance.
Earlier in the chapter we created a Turtle class, then extended that class to create a child class called ninjaTurtle . But should the ninjaTurtle class be a child of a Turtle class or a Ninja class? Some languages use multiple inheritance (although JavaScript is not one of them), but this can cause more problems than it solves.
The ‘Gorilla Banana’ problem occurs when you need a method from an object, so you inherit from that object. The name comes from a quote by Joe Armstrong, the creator of the Erlang programming language:
You wanted a banana but what you got was a gorilla holding the banana and the entire jungle.
The problem he describes is that if an object requires a banana() method that belongs to the Gorilla class, you have to inherit the whole class to gain access to that method. But as well as the method you wanted, the object also inherits a lot of other properties and methods that are not needed, causing it to become unnecessarily bloated.
A design pattern that seeks to solve these problems is to use ‘composition over inheritance’. This approach advocates creating small objects that describe single tasks or behaviors and using them as the building blocks for more complex objects. This is similar to the idea of pure functions that we discussed in the last chapter. These single-task objects are easier to test and maintain and can be combined together, using a mixin function, to create more complex objects. Composition over inheritance sees objects as building blocks that go together to make other objects rather than classes that are monolithic structures layered on top of each other.
If you do decide to use classes, it’s recommended to make them ‘skinny’ ― meaning they don’t have too many properties and methods. Another good practice when creating classes is to keep inheritance chains short. If you have long lines of inheritance, the objects at the end of these chains will usually end up being bloated with properties and methods they don’t need. It also causes problems if any of the objects in the chain need to change, as these changes will also affect other objects in the chain. A good rule of thumb is to only inherit once, keeping the inheritance chain to just two objects makes unpicking any issues far easier.
If you want to use a particular method from a class, but it has lots of properties and methods you don’t need, then it would be preferable to just ‘borrow’ the method instead, as we saw in the last section. So, borrow the banana method from the Gorilla class instead of inheriting the whole Gorilla!
banana = Gorilla.prototype.banana;An even better approach would be to move the banana() method into a separate object then add it as a mixin to the Gorilla class, and any other objects that required it.
The author (and general all-round JavaScript genius) Eric Elliot hasa lot to say about thisthat is worth reading.
Quiz Ninja Project
We’re going to make a big change to the user interface of the quiz game in this chapter. Instead of using a text input to answer the question, we’re going to provide three options that the player can choose from by simply clicking on the answer. This involves making the most changes to our code so far, so let’s get started.
The first thing we have to do is update the index.html file to replace the form with an empty <div> element. This will still have an ID of ‘response’ as it will be where we place the buttons that contain the answers for the player to click on:
<div id='response'></div>Then we have to remove the form helper methods in the view object. The view.resetForm() method can be deleted, as well as the call made to it in the view.setup() method. The following code needs removing:
resetForm(){ this.response.answer.value = ''; this.response.answer.focus();}// .... inside setup()this.resetForm();We can also remove this line from the end of main.js as we don’t need to hide the form at the start of the game anymore:
view.hide(view.response);Next we need to update the ask() function to the following:
ask(name){ console.log('ask() invoked'); if(this.questions.length > 2) { shuffle(this.questions); this.question = this.questions.pop(); const options = [this.questions[0].realName, this.questions[1].realName, this.question.realName]; shuffle(options); const question = `What is ${this.question.name}'s real name?`; view.render(view.question,question); view.render(view.response,view.buttons(options)); } else { this.gameOver(); }}First of all, this needs to check if the quiz.questions.length property is greater than 2, rather than 0, as we need at least three options in our array of questions in order to ask a question and present three possible answers. Then we shuffle the array of questions and select a question as before.
The next section involves selecting the three options that we will present to the player. These are placed inside an array called options . Obviously one of the options has to be the correct answer, which is this.question.realName . The other two options are simply the first and second elements in the shuffled array. The fact that we shuffled the array in order to choose a question at random means that the first two elements will also be different every time we select the options. These options now need displaying, so we need to use the view.render() method, although we need to use a helper method called view.buttons() to create the HTML to be rendered. Add the following code to the view object:
buttons(array){ return array.map(value => `<button>${value}</button>`).join('');}This method accepts an array as an argument, then uses the map() method to surround each value in the array with an HTML <button> tag. It then joins each element of the array together to produce a string of HTML. For example, if the array [ 'Clark Kent' , 'Bruce Wayne' , 'Diana Prince' ] was provided as an argument to the function, it would return the following string of HTML:
<button>Clark Kent</button> <button>Bruce Wayne</button> <button>Dianna Prince</button>This can then be used as an argument for the view.render() method to display a list of buttons inside the response <div> .
The answer will be submitted when the player clicks on one of these buttons. This means we need to change the event listener to fire on click events instead of the submit event. Change the code at the bottom of main.js to the following:
view.response.addEventListener('click', (event) => game.check(event), false);It still calls the game.check() method, but only when the player clicks on a button inside the ‘response’ <div> .
We’ll also have to update the game.check() method to take into account that the response from the player comes from clicking on a button rather than submitting a form. Update the function definition so that it looks like the following:
check(event){ console.log('check(event) invoked'); const response = event.target.textContent; const answer = this.question.realName; if(response === answer){ view.render(view.result,'Correct!',{'class':'correct'}); this.score++; view.render(view.score,this.score); } else { view.render(view.result,`Wrong! The correct answer was ${answer}`,{'class':'wrong'}); } this.ask();}We have removed the event.preventDefault() line, as this is no longer needed as we are not using a form to submit the answer. We also need to remove the call to view.resetForm() at the end of the method. Since we’re not using a form, we don’t need to reset it. The response variable needs to updated to point to the text contained inside the button element, which is stored in event.target.textContent . We can then use this to compare the player’s response with the actual answer.
Finally, we should probably update the quiz object that contains the questions so it includes more questions, as with only three, we can only ask one round before the game ends:
const quiz = [ { name: "Superman",realName: "Clark Kent" }, { name: "Wonder Woman",realName: "Diana Prince" }, { name: "Batman",realName: "Bruce Wayne" }, { name: "The Hulk",realName: "Bruce Banner" }, { name: "Spider-man",realName: "Peter Parker" }, { name: "Cyclops",realName: "Scott Summers" }];You might like to add some extra questions of your own, as it will make the game more interesting to have more than three options!
Have a go at playing the quiz by opening index.html in your browser. Providing options that the player can choose from makes the game much easier to play by not requiring any typing:
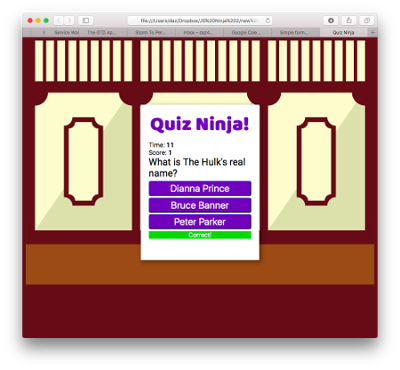
You can see a live example onCodePen.
Chapter Summary
- Object-oriented programming (OOP) is a way of programming that uses objects that encapsulate their own properties and methods.
- The main concepts of OOP are encapsulation, polymorphism and inheritance.
- Constructor functions can be used to create instances of objects.
- ES6 introduced class declarations that use the
classkeyword. These can be used in place of constructor functions. - Inside a constructor function or class declaration, the keyword
thisrefers to the object returned by the function. - All instances of a class or constructor function inherit all the properties and methods of its prototype.
- The prototype is live, so new properties and methods can be added to existing instances.
- The prototype chain is used to find an available method. If an object lacks a method, JavaScript will check whether its prototype has the method. If not, it will check that function’s prototype until it finds the method or reaches the
Objectconstructor function. - Private properties and methods can be created by defining variables using
constand defining a function inside a constructor function. These can be made public using getter and setter functions. - Monkey-patching is the process of adding methods to built-in objects by augmenting their prototypes. This should be done with caution as it can cause unexpected behavior in the way built-in objects work.
- A mixin method can be used to add properties and methods from other objects without creating an inheritance chain.
- Methods can be chained together and called in sequence if they return a reference to
this. - Polymorphism allows objects to override shared methods with a more specific implementation.
- The value of
thisis not retained inside nested functions, which can cause errors. This can be worked around by usingthat = this, using thebind(this)method and using arrow functions. - Methods can be borrowed from other objects.
- Composition over inheritance is a design pattern where objects are composed from ‘building-block’ objects, rather than inheriting all their properties and methods from a parent class.
In the next chapter, we’ll be looking at how to send and receive data using JavaScript.