Chapter 11: Interacting with a Database
In this chapter, let’s move on to talk about databases. Whenever we work with websites, it is highly likely that we need to store information (such as data entered by users) in a database.
This chapter assumes that you are familiar with MySQL. If you are not, I strongly recommend that you check out my other book, “Learn SQL (using MySQL) in One Day and Learn it Well” before proceeding.
If you are familiar with MySQL, let’s proceed.
11.1 The PDO library
To use a database in our PHP programs, we can use one of two built-in libraries.
A library is a collection of code that other developers have written and made available for us to use in our own programs. The two libraries available for connecting to a database in PHP are the MySQLi and PDO libraries.
Both essentially do the same job, connecting to the database and sending queries to it. However, there are some key differences between the two.
The main difference is that we can use the PDO library to connect to 12 different types of database servers – such as a MySQL server, an Oracle server, or a Microsoft SQL Server. In contrast, the MySQLi library only works with MySQL database servers.
For this reason, we’ll use the PDO library in this book.
11.2 Connecting to the Database
To send queries to our database using PDO , we need to connect to it first.
To do that, we need four pieces of information – the hostname of the server, the name of the database, the username of the account authorized to access that database and the password.
In most cases, the hostname is simply “localhost”. To get the other three pieces of information, you need to contact your database administrator. For the examples in this book, we’ll be our own database administrator and create a database and user account using phpMyAdmin in XAMPP later.
For now, let’s suppose you have a database called “pawszone” and a user account with username “pz_admin” and password “ABCD”.
In the following sections, we’ll first cover various concepts you need to know to work with PDO . After covering the concepts, we’ll get some hands-on practice with a PHP script that shows how the concepts can be applied. Ready?
Let’s learn to connect to our database first.
PDO uses an object-oriented approach. To connect to our database, we create a PDO object. For instance, to connect to the “pawszone” database, we use the code below:
$pdo = new PDO("mysql:host=localhost;dbname=pawszone", "pz_admin", "ABCD");
$pdo->setAttribute(PDO::AttR_ERRMODE, PDO::ERRMODE_EXCEPTION);
On the first line, we create a PDO object by passing three arguments to the PDO constructor.
The first argument is a string indicating the type of database we are using ( mysql: in our case), the hostname of the server ( host=localhost ), and the name of the database ( dbname=pawszone ).
The second argument is the username ( "pz_admin" ) and the third is the password ( "ABCD" ).
After creating this object, we assign it to a variable called $pdo and use $pdo to call the setAttribute() method on the next line.
The setAttribute() method allows us to set the attributes of a PDO object. Here, we are trying to set the error mode.
By default, after establishing a successful connection, PDO does not inform us of anything that goes wrong subsequently. For instance, if we try to select data from a table that does not exist, PDO will not inform us that there’s no such table. Instead, we’ll get a page with no results. This is very frustrating if we are trying to figure out what is wrong.
To get PDO to inform us of any issues, we need to use the setAttribute() method to configure the error mode. To do that, we pass two predefined constants to the method.
The first constant tells PDO the attribute we want to set, and the second tells PDO the value we want to set it to. You can find the list of all predefined PDO constants athttps://www.php.net/manual/en/pdo.constants.php.
In our example, we want to set the error mode attribute ( PDO::AttR_ERRMODE ) to PDO::ERRMODE_EXCEPTION .
In this mode, PDO throws an exception when something goes wrong. We’ll learn more about exceptions in the next chapter. For now, just know that we can use the information in this exception to figure out what went wrong.
That’s it! That’s all that’s needed to connect to a database. After connecting to our database, we are ready to send queries to it.
11.3 SQL Injection
There are two main types of queries in MySQL – ones that return data from the database (e.g., SELECT ) and ones that don’t (e.g., CREATE , INSERT , UPDATE and DELETE ).
The easiest way to send queries that do not return data is to use the exec() method, while the easiest way to send queries that do is to use the query() method.
However, both methods put us at risk of a form of attack known as an SQL injection.
Recall that we talked about cross-site scripting in Chapter 8.1.6? SQL injection is similar to that in that hackers can input data into our website and use it to hack our database.
Suppose we have a text field called “ownerName” and we want to select rows from a table called “pets” in our database, we can use the code below:
$owner = $_POST['ownerName'];
$sql = "SELECT * FROM pets WHERE owner = '$owner'";
$stmt = $pdo->query($sql);
Don’t worry if the code above does not make much sense yet. We’ll discuss a better method to query the database later. For now, just know that in the code above, we use the user input $_POST['ownerName'] in our SQL SELECT statement and use the query() method to execute the statement.
If our user enters Jamie into the “ownerName” text field, the SELECT statement becomes
SELECT * FROM pets WHERE owner = 'Jamie'and everything works as expected. However, suppose the user enters Jamie' OR owner != 'Jamie into the text field instead, the SELECT statement becomes
SELECT * FROM pets WHERE owner = 'Jamie' OR owner != 'Jamie'When we use the query() method to execute this statement, PHP interprets the word “OR” in the user input as the SQL operator OR . Hence, it returns ALL rows from the “pets” table, since owner = 'Jamie' OR owner != 'Jamie' covers all possible values for the “owner” column. This is definitely not desirable.
Instead of using the query() or exec() method to execute SQL statements, a better way is to use prepared statements.
11.4 Prepared Statements
There are a few steps involved when using prepared statements:
- Create the SQL statement using placeholders
- Prepare the statement
- Bind variables or values to the placeholders
- Execute the statement
- Fetch any data returned if necessary
Step 1: Creating the SQL statement using placeholders
When using prepared statements, we need to use placeholders to replace any variables that contain user inputs in our SQL statements. These placeholders can either be named or unnamed.
An unnamed placeholder is represented by a question mark. For instance, if we want to select information from the “pets” table using user inputs for two columns named “owner” and “petname”, we can use the SQL statement below:
$sqlUnnamed = "SELECT * FROM pets WHERE owner = ? AND petname = ?";Here, we use question marks ( ? ) to replace user inputs in our SQL statement and assign the statement to a variable called $sqlUnnamed . Alternatively, we can use named placeholders as shown below:
$sqlNamed = "SELECT * FROM pets WHERE owner = :owner AND petname = :pname";Here, we use :owner and :pname to replace user inputs and assign the statement to a variable called $sqlNamed .
Step 2: Prepare the statement
After creating the statement, we need to prepare it. Preparing a statement means sending the statement to your database server in advance, giving the server a chance to analyze, compile, and optimize its plan for executing the query. The actual execution does not happen at this step.
To prepare the statements, we use the prepare() method. This is a built-in method in the PDO class that prepares a SQL statement for execution and returns a PDOStatement object.
Suppose we have a PDO object called $pdo , to prepare the $sqlUnnamed statement, we write:
$preparedUnnamed = $pdo->prepare($sqlUnnamed);Here, we use $pdo to call the prepare() method and assign the object returned to a variable called $preparedUnnamed .
To prepare the $sqlNamed statement, we write
$preparedNamed = $pdo->prepare($sqlNamed);Here, we assign the object returned to a variable called $preparedNamed .
After preparing the statements, we won’t be using the $pdo object anymore. Instead, we’ll be using the PDOStatement objects (i.e., $preparedUnnamed and $preparedNamed ) in subsequent steps.
Step 3: Binding values to the placeholders
In step 3, we need to bind values to the placeholders in our SQL statements. This tells the database server what values to replace the placeholders with when executing the statements.
We can use either the bindValue() or bindParam() method to bind values to placeholders. Both methods are similar, but bindValue() tends to be more versatile. We’ll be using the bindValue() method in the examples that follow.
To bind values to unnamed placeholders, we typically provide two pieces of information to the bindValue() method – the position of the placeholder and the value to bind. The positions of placeholders start from 1.
Recall that we have a SELECT statement named $sqlUnnamed defined and prepared as follows?
$sqlUnnamed = "SELECT * FROM pets WHERE owner = ? AND petname = ?";
$preparedUnnamed = $pdo->prepare($sqlUnnamed);
Suppose we want to bind a user input called $myPet to the second question mark in $sqlUnnamed , this is how we can do it:
$preparedUnnamed->bindValue(2, $myPet);Here, we use $preparedUnnamed to call the bindValue() method.
The first argument ( 2 ) indicates that we are binding a value to the second placeholder (i.e., the placeholder for the “petname” column) while the second argument ( $myPet ) indicates the value to bind.
To bind values to named placeholders, we replace the first argument with the name of the placeholder, enclosed in quotation marks. For instance, if we want to bind $myPet to the :pname placeholder in $sqlNamed , we do it as follows:
$preparedNamed->bindValue(':pname', $myPet);The first argument ( ':pname' ) indicates that we are binding a value to the :pname placeholder while the second ( $myPet ) indicates the value to bind.
At this point, some of you may wonder if $myPet (which stores a user input) puts us at risk of an SQL injection attack.
The answer is no. This is because PDO knows that we’re sending it the value for a placeholder; hence, it’ll not interpret any part of the string stored in $myPet as SQL code.
For instance, even if $myPet stores the string
Max' OR petname != 'Maxthe word “OR”, the quotation marks and the != operator will not be interpreted as SQL code. Instead, PDO considers the entire string to be the value for the “petname” column and simply searches for pets with that weird name. Got it?
Step 4: Execute the statement
After binding values to our placeholders, we need to use the PDOStatement object to call the execute() method. To execute $preparedUnnamed , we write:
$preparedUnnamed->execute();To execute $preparedNamed , we write
$preparedNamed->execute();Step 5: Fetch the data returned, if any
After executing the statement, we can use either the fetch() or fetchAll() method to fetch any data returned (if the statement is a SELECT statement).
The fetch() method fetches the rows one by one while the fetchAll() method fetches all rows at once. Both methods return false on failure.
When using either method, we can specify the style we want the method to use when fetching the rows. Commonly used styles include the FETCH_ASSOC and FETCH_NUM styles.
The FETCH_ASSOC style fetches the rows as an associative array (using column names in the table as keys) while the FETCH_NUM style fetches them as an indexed array (based on the order of the columns returned by the SELECT statement).
For instance, to fetch the rows for $sqlUnnamed , we can use the following while loop:
while($row = $preparedUnnamed->fetch(PDO::FETCH_NUM)){
	echo 'Pet = '.$row[1].'<BR>';
	echo '<BR>Owner = '.$row[0].'<BR>';
}
This loop uses the assignment statement
$row = $preparedUnnamed->fetch(PDO::FETCH_NUM)as the condition for looping. This is permissible and is a common approach when working with the PDO fetch() method.
The assignment statement uses $preparedUnnamed (which is the prepared statement for $sqlUnnamed ) to call the fetch() method, specifying the fetch style as PDO::FETCH_NUM .
Next, it assigns the result returned to a variable called $row .
This variable controls when the while loop ends. The loop keeps looping as long as $row is not false . Within the while loop, we use two echo statements to display the values of the array returned by the fetch() method.
row[0] gives us the first column (i.e., the “owner” column) in $sqlUnnamed while row[1] gives us the second column (i.e., the “petname” column).
When we reach the end of the result set and the fetch() method is unable to fetch any more rows, it returns false . The while loop then stops looping as $row is now false .
Besides using the FETCH_NUM style, we can use the FETCH_ASSOC style to fetch our data. This is how we do it:
while($row = $preparedUnnamed->fetch(PDO::FETCH_ASSOC)){
	echo 'Pet = '.$row['petname'].'<BR>';
	echo '<BR>Owner = '.$row['owner'].'<BR>';
}
Both loops give us the same output; we’ll have a chance to run them and see the results later.
In addition to using the fetch() method, we can use the fetchAll() method to fetch all rows from the database at once. We’ll do that in the project at the end of the book.
That’s it. We’ve covered the gist of how prepared statements work. We are now ready to try the different SQL concepts covered above.
11.5 Putting it all Together
To do that, we need to create a database and user account first.
First, ensure that you have started XAMPP and the Apache and MySQL servers.
If you have problems starting the MySQL server, it is likely due to a port conflict. Check outhttps://learncodingfast.com/how-to-install-xampp-and-bracketsfor instructions on how you can resolve the issue.
Next, launchhttp://localhost/phpmyadmin/.
Click on “New” on the left and enter “pawszone” (without quotes) into the text field on the right.
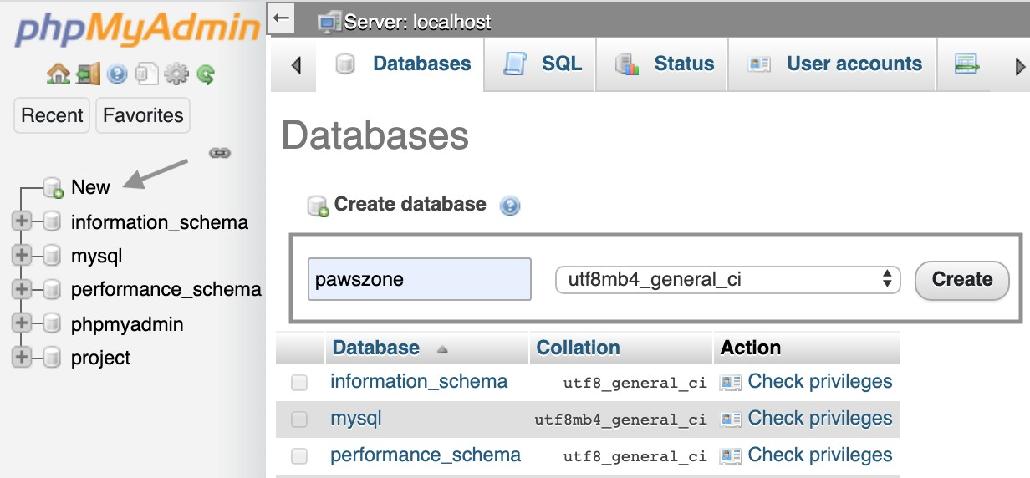
Click “Create” to create the database. You’ll be directed to the “pawszone” database. You can verify that by checking the gray bar at the top.

Next, click on “Privileges” and you’ll be directed to the page for creating a new user. At the bottom of the page, you’ll see a link that says “Add user account”. Click on it and enter the information shown in the screenshot below (leave other fields unchanged). Enter “ABCD” (without quotes) into the two password fields.
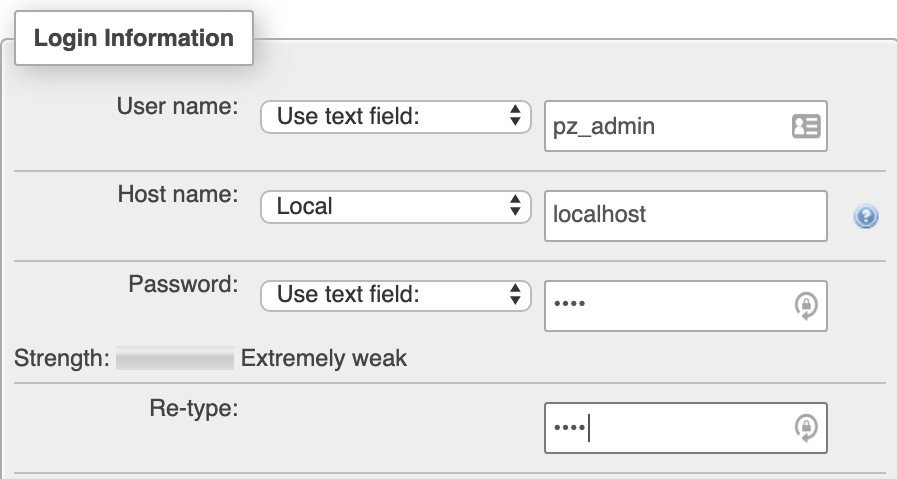
Scroll to the bottom of the page and click “Go” to create the user.
Once you are done, you’ll see a message that says “You have added a new user”. You are now ready to connect to the database you have just created.
Create a new file in Brackets and save it as sql_cud.php.
Add the following code to it (you can download the code athttps://learncodingfast.com/php).
<?php

//SECTION A - CONNECT TO DATABASE

$pdo = new PDO("mysql:host=localhost;dbname=pawszone", "pz_admin", "ABCD");
$pdo->setAttribute(PDO::AttR_ERRMODE, PDO::ERRMODE_EXCEPTION);

//SECTION B - CREATE TABLE

$sql = "CREATE TABLE IF NOT EXISTS pets ( owner VARCHAR(255) NOT NULL, petname VARCHAR(255) NOT NULL , breed VARCHAR(255) NOT NULL, microchip VARCHAR(20), PRIMARY KEY(owner, petname))";
$stmt = $pdo->prepare($sql);
$stmt->execute();

//SECTION C - INSERT DATA

$sql = "INSERT INTO pets (owner, petname, breed)
VALUES (:owner, :petname, :breed)";
$stmt = $pdo->prepare($sql);
$owner = array('Ted', 'Jamie', 'En', 'En');
$pname = array('Angel', 'Max', 'Boots', 'Dora');
$breed = array('Labradoodle', 'Domestic Shorthair', 'Domestic Shorthair', 'Munchkin');
for ($i = 0; $i < 4; ++$i){
	$stmt->bindValue(':owner', $owner[$i]);
	$stmt->bindValue(':petname', $pname[$i]);
	$stmt->bindValue(':breed', $breed[$i]);

	$stmt->execute();}

//SECTION D - UPDATE DATA

$sql = "UPDATE pets SET microchip = :micro WHERE owner = :owner AND petname = :petname";
$stmt = $pdo->prepare($sql);
$stmt->bindValue(':micro', '121342345');
$stmt->bindValue(':owner', 'Jamie');
$stmt->bindValue(':petname', 'Max');
$stmt->execute();

//SECTION E - DELETE DATA

sql = "DELETE FROM pets WHERE owner = :owner AND petname = :petname";
$stmt = $pdo->prepare($sql);
$stmt->bindValue(':owner', 'Ted');
$stmt->bindValue(':petname', 'Angel');
$stmt->execute();
In the code above, we first connect to the “pawszone” database in Section A.
Next, in Section B, we use a SQL CREATE statement to create a table called “pets” in our database. As this SQL statement does not have any placeholder, we do not need to call the bindValue() method. Instead, we simply prepare the statement and execute it.
In Section C, we have an INSERT statement for inserting data into the “pets” table. We first use the prepare() method to prepare this statement. Although we’ll be executing the INSERT statement four times using a for loop later, note that we only need to prepare the statement once. This is another advantage of using prepared statements as it can result in faster execution, especially if the query is complex or needs to be run many times.
After preparing the statement, we declare three arrays – $owner , $pname and $breed – and assign the data to be inserted to these arrays. Next, we use a for loop to loop through the arrays.
Each time the loop runs, we bind one value in each array to the relevant placeholder. After binding the data, we call the execute() method to execute the INSERT statement.
After inserting the data in Section C, we update a row (where owner = “Jamie” and petname = “Max”) in Sections D and delete another (where owner = “Ted” and petname = “Angel”) in Section E. These two sections should be quite self-explanatory.
Read through the code above carefully and fully understand it before proceeding. Once you are clear on how prepared statements work, load the page sql_cud.php in your browser to run the code.
Next, head over tohttp://localhost/phpmyadmin/and select the “pawszone” database on the left. You should see the “pets” table listed on the right. Click on “Browse” and you’ll get the following table:

As you can see, the “pets” table has been successfully created and data has been added to it. Got it?
Next, let’s learn to select data from this table and display it on our web page using PHP. To do that, create a new file called sql_select.php and add the following code to it.
<?php

//Section A - Connecting to the database

$pdo = new PDO("mysql:host=localhost;dbname=pawszone", "pz_admin", "ABCD");
$pdo->setAttribute(PDO::AttR_ERRMODE, PDO::ERRMODE_EXCEPTION);

//Section B - SELECT all rows from pets

$sql = "SELECT petname, owner FROM pets";
$stmt = $pdo->prepare($sql);

$stmt->execute();

while ($row = $stmt->fetch(PDO::FETCH_ASSOC)){
	echo '<BR>Owner = '.$row['owner'].'<BR>';
	echo 'Pet Name = '.$row['petname'].'<BR>';
}
$stmt->execute();

while ($row = $stmt->fetch(PDO::FETCH_NUM)){
	echo '<BR>Owner = '.$row[1].'<BR>';
	echo 'Pet Name = '.$row[0].'<BR>';}
Here, as before, we first connect to the “pawszone” database in Section A. Next, in Section B, we use a SELECT statement to select the “petname” and “owner” columns from the “pets” table.
After executing the statement, we use a while loop to fetch the rows one by one, using the FETCH_ASSOC style. Finally, we use echo statements inside the while loop to display the data fetched.
Next, we execute the SELECT statement again and use another while loop to fetch the rows using the FETCH_NUM style.
If you load sql_select.php in your browser, you’ll get the following output displayed twice:
Owner = EnPet Name = Boots
Owner = EnPet Name = Dora
Owner = JamiePet Name = Max